
Adding products to online registration
Adding Simple Products to Online Registration Using Team or Angler Groups
You can make products such as tournament merchandise, meal tickets, or any other item available for purchase using Team or Angler Groups
The products will appear as a text-based list with a checkbox next to each. The person registering can check the box next to any product to include it with their registration.

Deciding whether to use Team Groups or Angler Groups
A list of products can either be made available to the registering team as a whole or to each individual angler, or both. Which one you use depends on who your intended audience is for the product list and whether or not you are already using your Team or Angler Groups for another purpose (e.g. TWTs, Calcuttas, Side Bets, etc).
- Use
Team Groupsto show a listing of one or more products to a team and show it alongside the team registration information. - Use
Angler Groupsto show a listing of one or more products to an individual angler and show it alongside the angler registration information.
Example: Adding a list of products
As an example, we'll add a list of additional meal ticket options available for purchase by each individual angler registering to our tournament. We'll use the Angler Groups for this, but the same steps and method can be used to add products to a team using Team Groups instead.
Follow these instructions to add a list of products, in this case meal ticket options, to a tournament:
Enable angler groups for a tournament:
- Access your tournament under Tournaments > Manage Tournaments and choose
Tournament Setupfrom theActionsmenu. Alternatively, you can click theSetupicon if you're already within the tournament. - Click the gray
Tournament Settingsbutton. - Choose the
Divisionstab and then set the Enable Groups option to enable either angler groups, team groups, or both. For our meal ticket options, we'll enable angler groups and we'll set the group name to 'Meal Tickets'. - Click the blue
Save Changesbutton to save your settings.
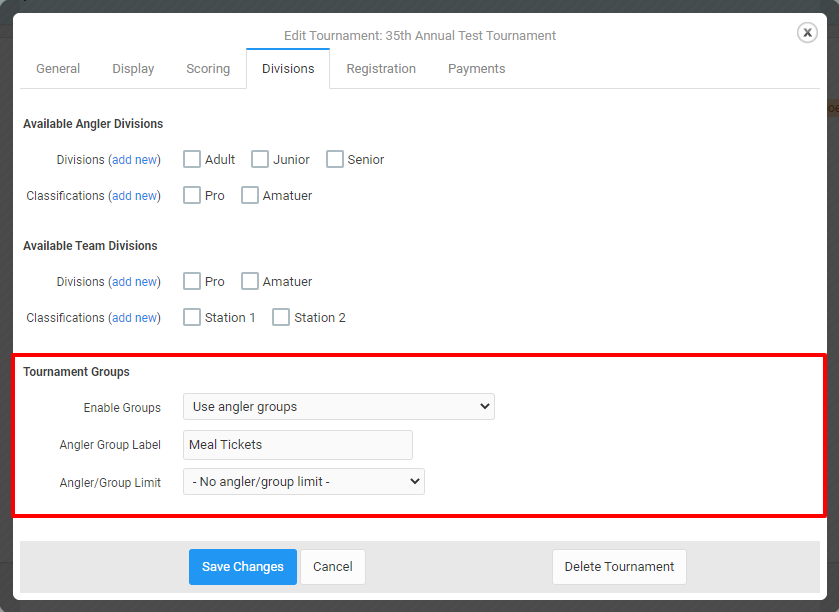
Divisions tab of the main tournament settings.
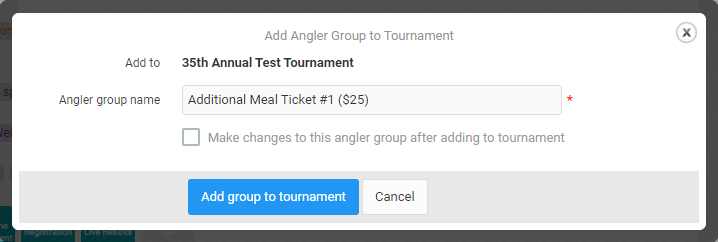
Adding your products as angler groups:
- On the Tournament Setup page, click the
+Add angler groupbutton next to Angler Groups. - Enter the name of the first product you wish to make available for purchase (e.g. Additional Meal Ticket #1 - $25). Optionally you may include the price of the product in the name to make it more transparent to your registering anglers.
- Click the blue
Add group to tournamentbutton to add the new item. - Repeat these steps to add all of the products you wish to make available (e.g. Additional Meal Ticket #2 - $25, ...)
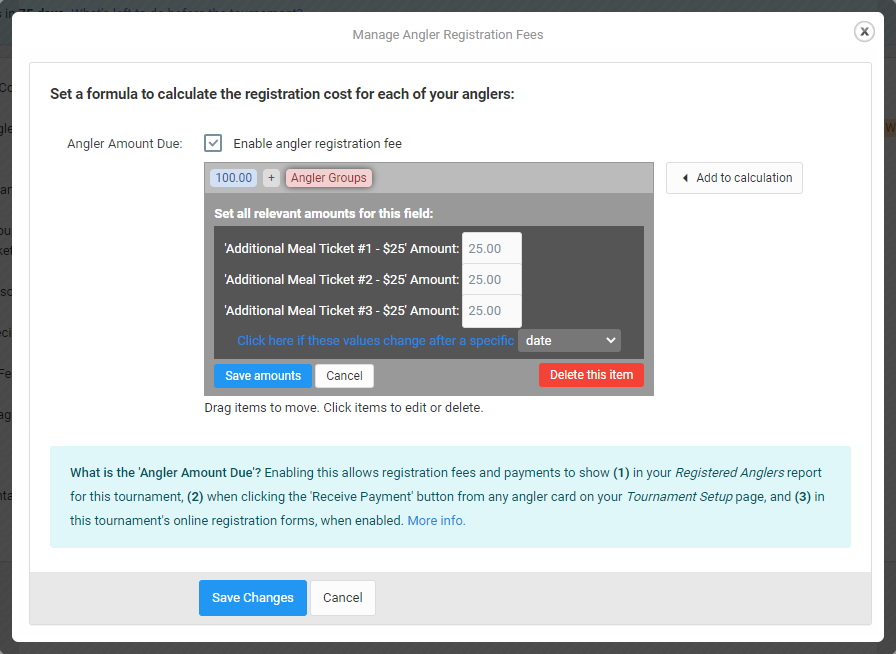
Setting a fee for each group:
- Click
Anglernext to Registration Fees. - Check the box labeled Enable angler registration fee if not already enabled.
- Optionally, remove any existing items from the angler registration fee calculation by clicking each item and then clicking the red
Delete this itembutton. If adding these group fees to an existing calculation, you can add a+operator before the next step by clicking theAdd to calculationbutton and clicking+from the Add an operator option. - Click the
Add to calculationbutton, then chooseAngler Groupsfrom the Angler Item dropdown and finally click the blueAdd itembutton. A new Angler Groups item will appear in the calculation area. - Click the
Angler Groupsitem in the calculation, then set an amount for each angler group product (see Image 4). - Click the blue
Save amountsbutton to save the fees for these angler groups. - Click the
Save Changesbutton to finish and save your new registration fee setup.
For more information about setting up registration fees, click here.
Activating angler groups on the online registration form:
- Under Tournament Pages, click the
Registrationpage icon. - Locate either a
Team Registration FormorIndividual Registration Formcomponent, then click the pencil icon on that component to edit it. - On the dialog that appears, choose the
Form Fieldstab. From the list of form fields, find theAngler Group Choicecheckbox and make sure it is checked, if not already. - Optionally, change the text next to the option by clicking the "Angler Groups" text and modifying it. For our example, we'll change the text to "Additional Meal Tickets (optional)".
- When finished, click the
Save Changesbutton.
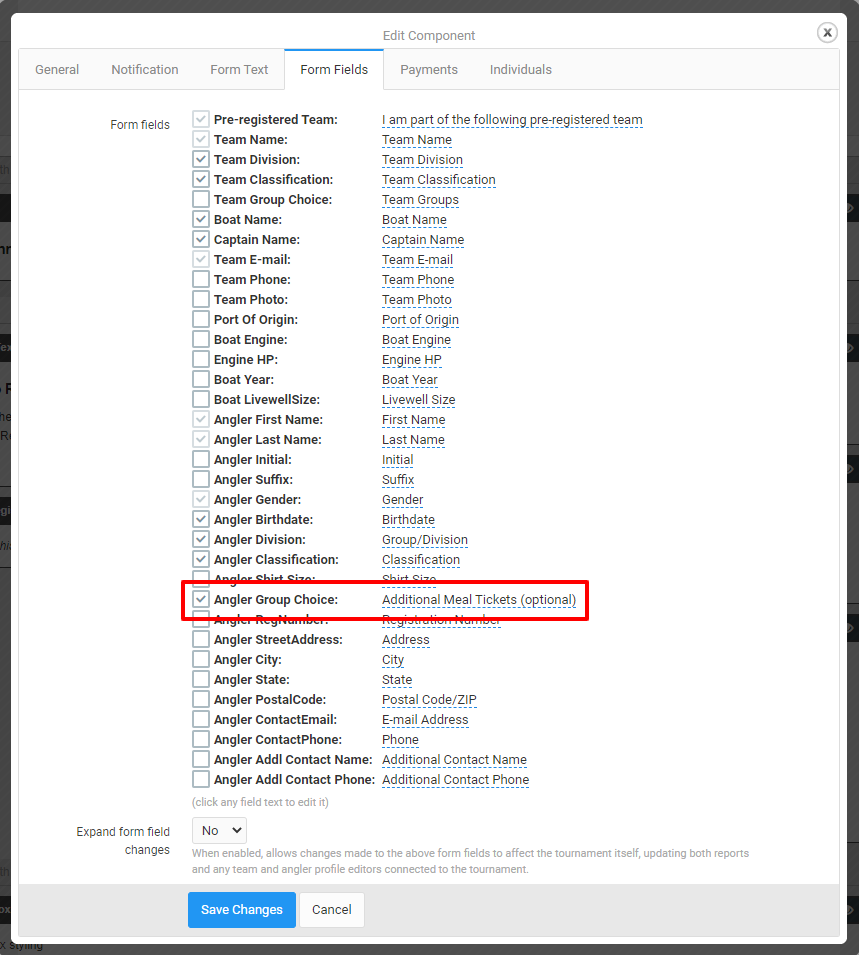
Angler Group Choice checkbox from the the Form Fields tab on a Team Registration form.
Following this example will set up one or several meal ticket choices for each individual angler registering to your tournament. You can test out your changes from the Registration page by clicking the purple View on website button anytime from the Page Editor.
Why are my team or angler group options showing horizontally?
The default styling for group options is to show them from left-to-right. If you would like to show them vertically, you can add a newScript Box component anywhere on your page and add the following code to the Code area of that script box: